(4.2) 예외처리와 알림 서비스_예외처리 메세지 pop-up(팝업)_
영어쌤이 만드는 회원가입, 인증[CRUD] 만들어욤! 리액트와 파이썬 장고

이전 포스팅에선 예외처리하고 발생시킨 알림들을 Hard coding으로 넘겼습니다. 그랬을 시에 다음과 같은 문제가 있다고 마지막에 언급했습니다.
1. hard coding 되어 발생되는 메세지로는 한계가 있습니다.
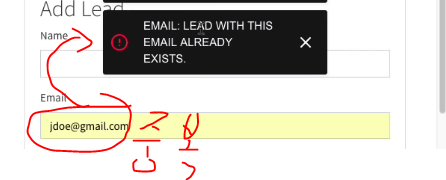
2. 만약 이미 등록되어 있던 이메일과 동일한 이메일을 입력해 생성 시도할 경우 상태는 다르지만 같은 누락된 것과 동일한 메세지가 출력될 것 입니다. 그렇게 hard coding 된 코드들을 조금 더 정확하게 출력해 줄 수 있도록 수정해 줄 것 입니다.
그러면 이제 실제 발생되는 메세지들을 활용하여 좀 더 자세한 핸들링을 할 수 있도록 작업해 줍니다.
옳지 않게 발생된 메세지의 예:
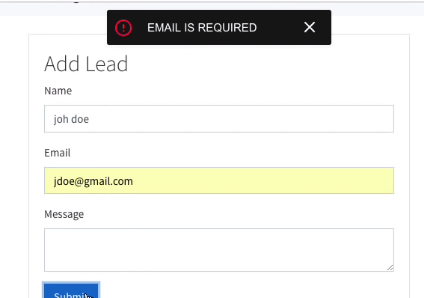
- 위와 같이 이미 list에 포함되어 있어 등록 불가한 에러를 엉뚱하게도 'Email is required(Email 정보가 누락되었습니다.)'로 처리하는 경우가 발생했습니다.
- Redux Tool 에선 어떻게 나오는지 먼저 살펴보면 좋겠습니다.
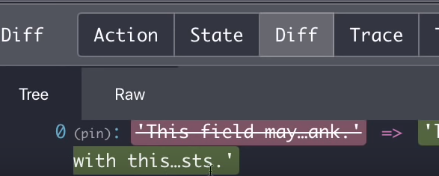
- 위와 같이 email already exists 와 같은 메세지가 발생한 것을 확인할 수 있습니다.
- 이것을 활용하여 기존의 하드코딩 방식을 버리고 새롭게 Redux를 활용하여 서비스의 질을 높힙니다.
- 작업에 약간의 난이도가 있을 수 있습니다. 기존은 하드코딩이었다면 이번엔 Array(배열)을 이용해야 하기 때문입니다.
(15) Alerts.js 파일 수정
- 가장 먼저 Name과 Email에 대한 기존의 메세지를 Redux tool에서 확인했던 배열에서 가지고 옵니다.
- 이때 전에 썼던 Backticks( ` )를 따옴표 대신 사용합니다.
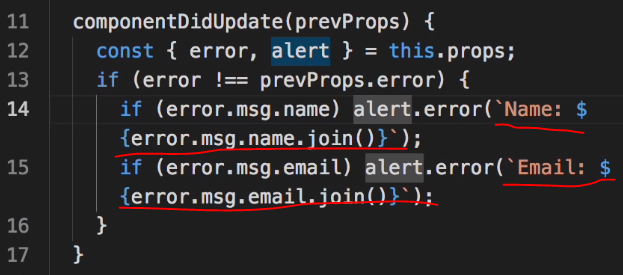
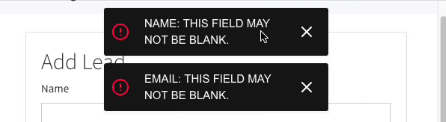
- 오류 발생시 다음과 같은 결과를 얻을 수 있습니다.
- 기존의 list의 내용에서 중복이 되어 발생되는 오류는 다음과 같이 서버에서 발생되는 메세지를 띄웁니다.
- message에 대한 누락 에러 메세지도 발생시켜 주세요. 다음의 코드를 추가 작성합니다.

// Alerts.js
import React, { Component, Fragment } from 'react';
import { withAlert } from 'react-alert';
import { connect } from 'react-redux';
import PropTypes from "prop-types";

export class Alerts extends Component {
	static propTypes = {
    	error: PropTypes.object.isRequired
    }
}

export class Alerts extends Component {
    componentDidMount(prevProps) {
    	const { error, alert } = this.props;
        if(error !== prevProps.error) {
        	if(error.msg.name) alert.error(`Name: ${error.msg.name.join()}`);
            if(error.msg.email) alert.error(`Email: ${error.msg.email.join()}`);
            if(error.msg.message) alert.error(`Message: ${error.msg.message.join()}`);
        }
    }

	render() {
    	return <Fragment />;
    }
}

const mapStateToProps = state => ({
	error: state.errors
});

export default connect(mapStateToProps)(withAlert(Alerts));
(16) Delete 동작에 대한 메세지 발생시키기
- delete 동작 시에도 그에 맞는 메세지를 발생하게 해 주세요.
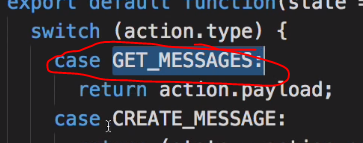
(17) /src/reducers/messages.js 파일 생성 및 작성 시작
- 기본적으로 errors.js와 비슷한 구조이므로 그대로 먼저 복사해 가져와 수정해 주면 시간이 단축됩니다.
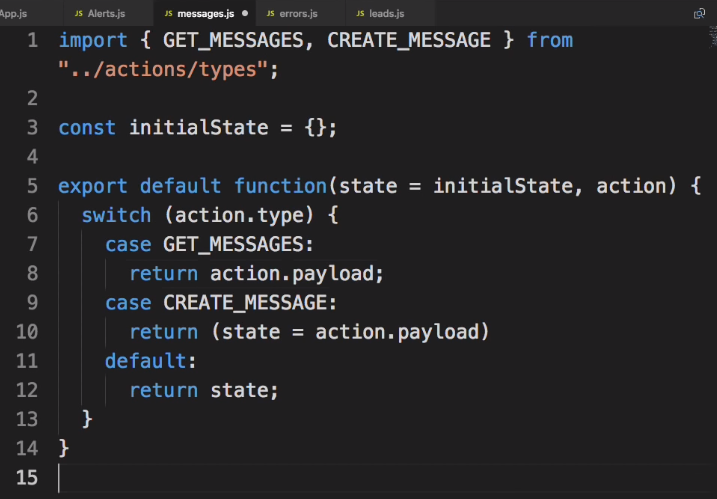
// messages.js
import { GET_MESSAGES, CREATE_MESSAGE } from '../actions/types';

// 이 코드로 인해 앞으로의 결과에 따라 발생되는 것들이 객체의 형태가 됩니다.
const initialState = {};

export default function(state = initialState, action) {
	switch (action.type) {
    	case GET_MESSAGES:
        //객체가 될 것이기 때문에 아래와 같이 수정합니다.
        	return action.payload;
        case CREATE_MESSAGE:
            return (state = action.payload)
          default:
          	return state;
    }
}
(18) /src/actions/types.js에 메세지 관련 코드 추가 작성
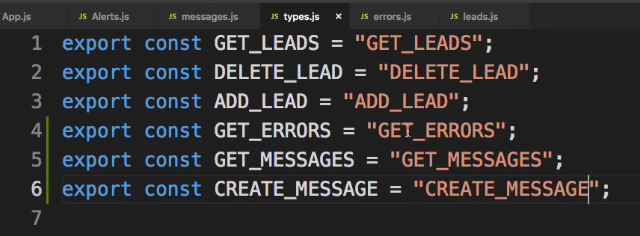
// /src/actions/types.js
export const GET_LEADS = "GET_LEADS";
export const DELETE_LEAD = "DELETE_LEAD";
export const ADD_LEAD = "ADD_LEAD";
export const GET_ERRORS = "GET_ERRORS";
export const GET_ERRORS = "GET_MESSAGES";
export const GET_ERRORS = "CREATE_MESSAGE";
(19) root reducer에 messgae 관련 코드 추가 작성 || /src/reducers/index.js

// /leadmanager/frontend/src/reducer/index.js
import { combineReducers } from 'redux';
import leads from './leads';
import errors from "./errors";
import messages from "./messages";

export default combineReducers({
	leads,
    errors,
    messages
});
(20) /src/actions/messages.js || 메세징 action 추가하기
- actions 폴더 내에 messages.js 파일을 생성 및 다음과 같이 작성합니다.
- 메세징 기능을 담당합니다.
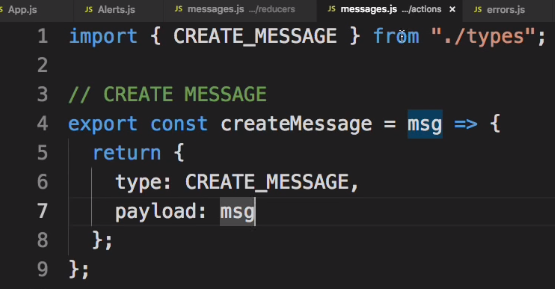
// messages.js
import { CREATE_MESSAGE } from './types';

// CREATE MESSAGE
export const createMessage = msg => {
	return {
    	type: CREATE_MESSAgE,
        payload: msg
    };
};
(21) /src/actions/leads.js에 코드 추가 작성하기
- 다음과 같이 message에 대한 내용을 작성 및 추가해 줍니다.


import axios from 'axios';
import { createMessage } from './messages';

import { GET_LEADS, DELETE_LEAD } from './types';

// GET LEADS
export const getLeads = () => dispatch => {
	axios.get("/api/leads/")
    	.then(res => {
        	dispatch({
            	type: GET_LEADS,
                payload: res.data
            });
        })
        .catch(err => console.log(err));
};

// DELETE LEAD
export const deleteLeads = (id) => dispatch => {
	axios.delete(`/api/leads/${id}/`)
    	.then(res => {
        	dispatch(createMessage({ deleteLead: "Lead Deleted" }));
        	dispatch({
            	type: DELETE_LEADS,
                payload: id
            });
        })
        .catch(err => console.log(err));
};

// ADD LEADS
export const addLeads = () => dispatch => {
	axios.post("/api/leads/") // 실제 데이터를 보내기 위한 명령어도 POST입니다. 그러니 post로!
    	.then(res => {
        	dispatch({
            	type: ADD_LEADS,
                payload: res.data
            });
        })
        .catch(err => {
        	const errors = {
            	msg: err.response.data,
                status: err.response.status
            }
            dispatch({
            	type: GET_ERRORS,
                payload: errors
            });
        });
};
(22) /src/components/layout/Alerts.js 에 코드 추가 작성
- 다음과 같이 message 관련 코드를 추가합니다.
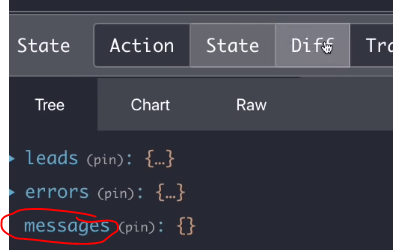
- Redux Tools에서 확인해 보면 messages 라는 항목이 객체로 나오게 됩니다.
- 다시 코드로 돌아가 마저 작성해 줍니다.

// Alerts.js
import React, { Component, Fragment } from 'react';
import { withAlert } from 'react-alert';
import { connect } from 'react-redux';
import PropTypes from "prop-types";
export class Alerts extends Component {
static propTypes = {
error: PropTypes.object.isRequired,
message: PropTypes.object.isRequired
}
}
export class Alerts extends Component {
componentDidMount(prevProps) {
const { error, alert, message } = this.props;
if(error !== prevProps.error) {
if(error.msg.name) alert.error(`Name: ${error.msg.name.join()}`);
if(error.msg.email) alert.error(`Email: ${error.msg.email.join()}`);
if(error.msg.message) alert.error(`Message: ${error.msg.message.join()}`);
}
if(message !== prevProps.message) {
if(message.deleteLead) alert.success(message.deleteLead);
}
}
render() {
return <Fragment />;
}
}
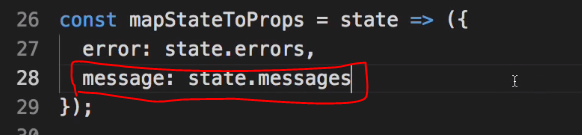
const mapStateToProps = state => ({
error: state.errors,
message: state.messages
});
export default connect(mapStateToProps)(withAlert(Alerts));결과화면
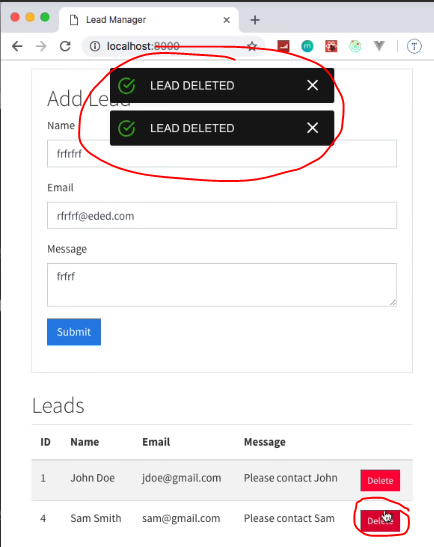
- delete 버튼을 클릭하면 해당 lead는 삭제되며 다음의 이미지와 같이 LEAD DELETED 메세지를 방생시킵니다.
(23) Lead 추가시 해당 메세지 발생 기능 추가
- Delete 관련 메세지 발생 과정을 그대로 따라갑니다.
- 메세지에 대해 추가적인 사항을 만들때 지금과 같은 작업을 반복하면 됩니다.
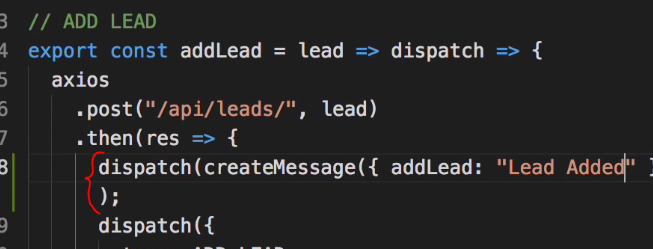
(24) /src/actions/leads.js
- leads.js 파일 내의 코드중 DELETE LEAD 부분의 dispatch(createMessage 부분을 복사합니다.

- ADD LEAD부분에서 DELETE LEAD의 해당 dispatch 코드와 같은 위치에 붙여넣기 및 add 에 맞게 수정합니다.
import axios from 'axios';
import { createMessage } from './messages';

import { GET_LEADS, DELETE_LEAD } from './types';

// GET LEADS
export const getLeads = () => dispatch => {
	axios.get("/api/leads/")
    	.then(res => {
        	dispatch({
            	type: GET_LEADS,
                payload: res.data
            });
        })
        .catch(err => console.log(err));
};

// DELETE LEAD
export const deleteLeads = (id) => dispatch => {
	axios.delete(`/api/leads/${id}/`)
    	.then(res => {
        	dispatch(createMessage({ deleteLead: "Lead Deleted" }));
        	dispatch({
            	type: DELETE_LEADS,
                payload: id
            });
        })
        .catch(err => console.log(err));
};

// ADD LEADS
export const addLeads = () => dispatch => {
	axios.post("/api/leads/") // 실제 데이터를 보내기 위한 명령어도 POST입니다. 그러니 post로!
    	.then(res => {
        dispatch(createMessage({ addLead: "Lead Added" }));
        	dispatch({
            	type: ADD_LEADS,
                payload: res.data
            });
        })
        .catch(err => {
        	const errors = {
            	msg: err.response.data,
                status: err.response.status
            }
            dispatch({
            	type: GET_ERRORS,
                payload: errors
            });
        });
};
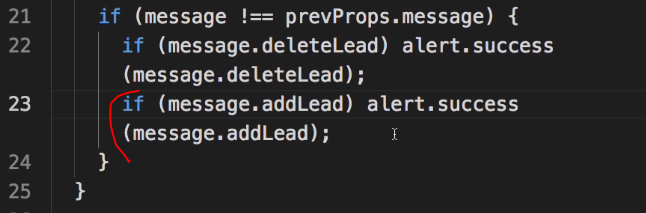
(25) /src/components/layout/Alerts.js || Add Lead 에 대한 코드 추가
- 다음과 같이 코드를 추가해 줍니다.
// Alerts.js
import React, { Component, Fragment } from 'react';
import { withAlert } from 'react-alert';
import { connect } from 'react-redux';
import PropTypes from "prop-types";

export class Alerts extends Component {
	static propTypes = {
    	error: PropTypes.object.isRequired,
        message: PropTypes.object.isRequired
    }
}

export class Alerts extends Component {
    componentDidMount(prevProps) {
    	const { error, alert, message } = this.props;
        if(error !== prevProps.error) {
        	if(error.msg.name) alert.error(`Name: ${error.msg.name.join()}`);
            if(error.msg.email) alert.error(`Email: ${error.msg.email.join()}`);
            if(error.msg.message) alert.error(`Message: ${error.msg.message.join()}`);
        }
        if(message !== prevProps.message) {
        	if(message.deleteLead) alert.success(message.deleteLead);
            if(message.addLead) alert.success(message.addLead);
        }
    }

	render() {
    	return <Fragment />;
    }
}

const mapStateToProps = state => ({
	error: state.errors,
    message: state.messages
});

export default connect(mapStateToProps)(withAlert(Alerts));
(26) 동작 확인
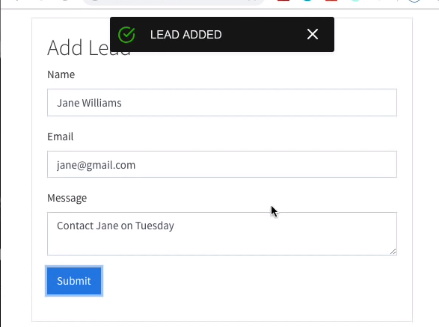
- 새로운 Data를 입력 및 Submit(제출) 해 주면 다음과 같은 성공 메세지를 받습니다.
- 또한, 리스트에 해당 data가 반영됨을 확인할 수 있습니다.

(27) 앗!!! 그러고 보니 messages.js 에서 확인해 보니 사용하지 않는데 넣어 둔 기능이 있었네요! 빼줍니다.
- 바로 이 녀석입니다. [ /src/reducers/messages.js ]
- 너는 영구제명이다!!!
- 이젠 message를 받는 것이 아닌 create 즉 생성하기 때문입니다.
- 그러면 첫번째 줄의 import에서 빼줍니다.
// messages.js
import { CREATE_MESSAGE } from '../actions/types';

// 이 코드로 인해 앞으로의 결과에 따라 발생되는 것들이 객체의 형태가 됩니다.
const initialState = {};

export default function(state = initialState, action) {
	switch (action.type) {
        case CREATE_MESSAGE:
            return (state = action.payload)
          default:
          	return state;
    };
};
- /src/actions/types.js 에서도 GET_MESSAGE를 빼 줍니다.

// /src/actions/types.js
export const GET_LEADS = "GET_LEADS";
export const DELETE_LEAD = "DELETE_LEAD";
export const ADD_LEAD = "ADD_LEAD";
export const GET_ERRORS = "GET_ERRORS";
export const CREATE_MESSAGE = "CREATE_MESSAGE";
(28) 마지막 작업!!! 작성 완료 후 Submit(제출) 하면 해당 입력 폼 비워주기(clear)

- 지금까지 작업했을땐 Submit 버튼을 클릭하면 반영되고 서버에도 저장이 되는 것으 확인했습니다.
- 이젠 자동으로 깔끔히 비워주는 작업을 해 줍니다.
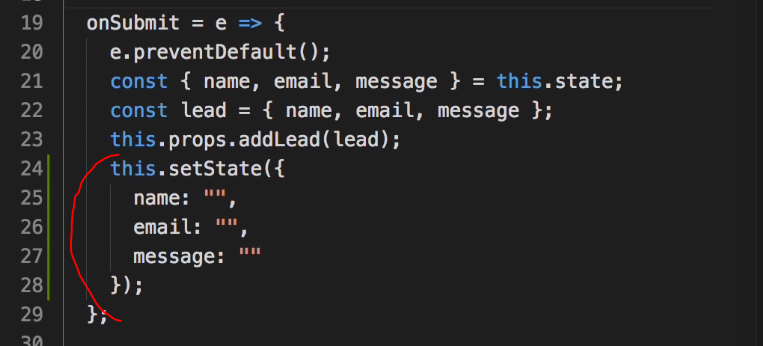
(29) /src/components/leads/Forms.js 파일에 코드 추가 작성
- onSubmit 즉, Submit 버튼을 클릭했을 시에 동작이 일어나는 것을 뜻합니다.
- 하여, onSubmit이 되면 아래의 코드와 같이 아무것도 없는 족이 Form에 올라가도록 작성해 줍니다.
// Form.js
import React, { Component } from 'react';
import {connect} from 'react-redux';
import PropTypes from 'prop-types';
import { addLead } from '../../actions/leads';

export class From extends Component {
	state = {
    	name: '',
        email: '',
        message: ''
    }

    static propTypes = {
    	addLead: PropTypes.func.isRequired
    };

    onChange = e => this.setState({ [e.target.name]: e.target.value });

    onSubmit = e => {
    	e.preventDefault();
        // console.log("submit");
        const { name, email, message } = this.state;
        const lead = { name, email, message };
        this.props.addLead(lead);
        this.setState({
        	name: "",
            email: "",
            message: ""
        });
    }

    render() {
    	const { name, email, message } = this.state;
    	return (
        	<div className="card card-body mt-4 mb-4">
            	<h2>Add Lead</h2>
                <form onSubmit={this.onSubmit}>
                	<div className="form-group">
                    	<label>Name</label>
                        <input
                        	className="form-control"
                            type="text"
                            name="name"
                            onChange={this.onChange}
                            value={name}
                        />
                    </div>
                   	<div className="form-group">
                    	<label>Email</label>
                        <input
                        	className="form-control"
                            type="email"
                            name="email"
                            onChange={this.onChange}
                            value={email}
                        />
                    </div>
                    <div className="form-group">
                    	<label>Message</label>
                        <input
                        	className="form-control"
                            type="text"
                            name="message"
                            onChange={this.onChange}
                            value={message}
                        />
                    </div>
                    <div className="form-group">
                    	<button type="submit" className="btn btn-primary">
                        	Submit
                        </button>
                    </div>
              </form>
         </div>
        )
    }
}

export default connect(null, { addLead })(Form);
(30) 동작 확인
- 다음과 같이 작성 후 Submit을 하면 기존의 코드를 따라 List트에 반영되게 됩니다.
- 그리고 신규 업데이트한 코드에 의해 각 폼들은 모두 빈 폼이 되었습니다.

이렇게 이번 이벤트 에러 등에 대한 핸들링을 하였습니다.
다음은!!!!
드디어 이번 리액트 장고 프로젝트의 꽃에 가까워지는
[5] _ 장고 토큰 인증(Django Token Authentication) 이 되겠습니다.
다음 순서를 간략히나마 언급하는게 좋겠습니다.
1. Implementing authentication
2. 로그인 페이지
3. 등록(register page)
4. React router 사용
5. Dealing with the backend as well~~.(Server Side도 다뤄줘야 합니다.)
6. 5번의 이유는 어느 한 계정으로 로그인 시 해당 계정이 부여받은 권한 밖의 정보는 볼 수 없게 해 줘야 하기 때문이죠.
7. Accounts 라는 Django Backend app(API)을 추가할 것 입니다.
벌써 새벽 5시가 되었네요... 밝아지고있떠어~!!!
잠깐 쉬었다가 오겠습니다!
Stay tuned for the next episode of Web development by the English teacher JOHNNYCLUB!!!


